Have you ever wondered why your miter saw cuts are not perfect? A simple DIY blade change could be the trick to perfect woodworking projects. Learn how changing your DeWalt miter saw blade can make your work go from okay to great. It doesn’t matter if you use the DWS715 or another DeWalt model. It’s crucial to know how to change the blade safely and correctly.
With our easy guide on a DeWalt miter saw blade replacement, you’ll be cutting like a pro in no time. It’s helpful for experienced woodworkers and beginners. Follow these steps to keep your DeWalt miter saw cutting sharply and accurately.
Key Takeaways
- Identifying signs that necessitate a miter saw blade change.
- Understanding the safety and performance benefits of regular maintenance.
- Evaluating steps for the safe removal and installation of a DeWalt saw blade.
- Gaining confidence in DIY blade changes to uphold DeWalt quality cuts.
- Ensuring the longevity and reliability of your miter saw with proper upkeep.
Introduction to Changing a Blade on a DeWalt Miter Saw
Changing the blade on your DeWalt saw is key. It keeps your tool working well and safe. For DIY lovers or professional woodworkers, knowing how to swap a miter saw blade is important. It helps your tool last longer and work better.
Switching the blade on your DeWalt saw makes cuts cleaner and sharper. It also helps the saw parts wear out slower. The steps to change the blade are easy and safe if done right.
The first step is picking the right blade for what you want to cut. Then, make sure the saw is stable and your work area is safe. Let’s look closely at each step of the DeWalt blade change process. This will help you use your saw with more skill and safety.
Understanding Your DeWalt Miter Saw
Learning about your DeWalt miter saw is key for safety and top performance. Each part of the saw is important. Knowing these parts helps make your saw last longer and work better. Let’s look at the miter saw parts and their roles. We’ll see how keeping up with maintenance can make your tool last longer.
Key Components and Their Functions
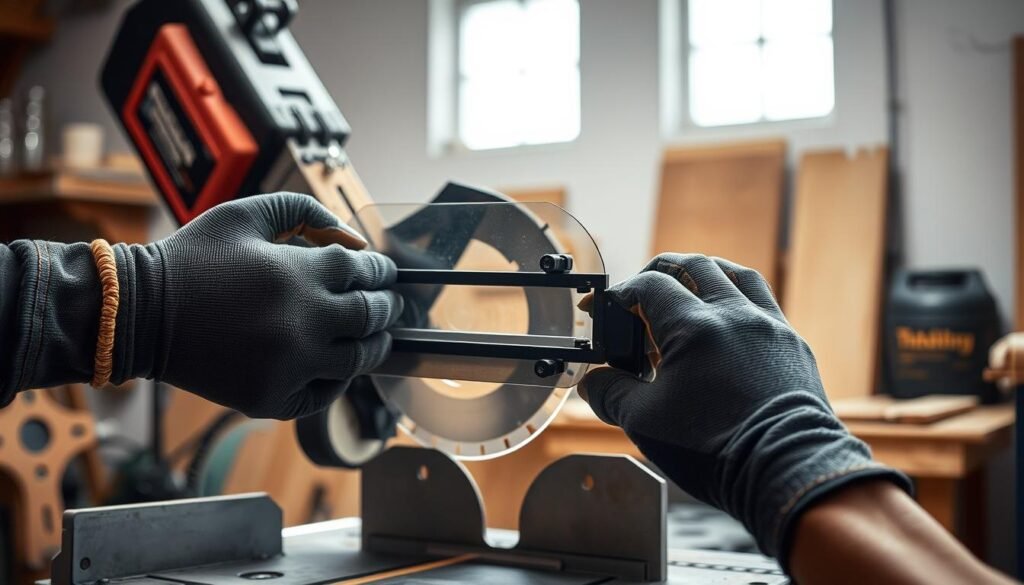
The DeWalt miter saw is strong and precise because of its design. Important parts include the blade guard, bracket screw, and spindle lock. The blade guard keeps you safe by covering the sharp blade. The bracket screw holds the guard and the blade arm in place. This is important when you need to adjust or change the blade. The spindle lock keeps the blade from moving when you’re working on it. This keeps everything safe and accurate.
The Importance of Regular Maintenance
Regular maintenance is more about stopping problems before they start, not just fixing them. Keeping the saw clean, making sure the electrical parts are good, and oiling moving parts are all big parts of keeping your saw working right.
Checking and replacing important saw parts regularly makes it work better and safer. This stops accidents and makes your miter saw last longer and work reliably. Whether you’re doing this for a job or a hobby, keeping your saw in good shape means you can always make precise cuts.
Good maintenance also makes your saw last longer. This way, you don’t have to spend a lot on fixing or replacing it. It means you can keep working without having to stop.
Essential Tools and Safety Gear Needed
When you work on your DeWalt saw, having the right tools and gear is key. They make sure you work well and stay safe. Changing a blade needs a special wrench and safety gear to avoid harm.
The Role of a Blade Wrench
A blade wrench is a must for safely changing saw blades. It’s made to snugly fit the blade screw. This helps make sure the blade is tight and won’t slip while you use the saw. It’s a big part of keeping your DeWalt saw in good shape.
Selecting Heavy-Duty Work Gloves and Protective Glasses
Safety gear like tough gloves and protective glasses is very important. They protect you from injuries while working. Gloves keep your hands safe from cuts and the heat of friction. Glasses keep small particles from hurting your eyes. Wearing the right gloves and glasses keeps the work area safe.
- Heavy-duty work gloves – Protects from cuts and abrasions.
- Protective glasses – Shields eyes from flying debris.
How to Change the Blade on DeWalt Miter Saw
Changing the blade on a DeWalt miter saw is easy if you follow the steps right. Whether you need to change the blade because it’s worn out or for a different task, here’s how to do it safely and well.

First, make sure your miter saw is unplugged to avoid any accidents. Then, remove the blade guard to get to the blade. Remember to keep all screws and parts in order so you can put everything back together easily after.
- Find the blade bolt and the arbor that keeps the blade in place. Use the wrench that came with your saw. Turn the bolt the opposite way of the clock to loosen it.
- Take off the bolt and carefully remove the old blade. Be careful to avoid getting hurt.
- Put the new blade on the arbor, making sure the teeth are pointing the right way. The arrow on the blade should show the same direction your saw spins.
- Put the bolt back and tighten it the way of the clock with the wrench until it’s tight.
- Put the blade guard back on, along with any other parts you took off.
By following these steps, you can replace the blade on your DeWalt saw like a pro. Always check the guide that came with your saw for any special instructions. Changing the blade regularly keeps your saw working great and your cuts precise.
Preparing Your Work Area and Miter Saw for Blade Replacement
Start by setting up a safe work area. It’s key to keep your power tool safe by disconnecting it. Make sure your DeWalt miter saw is not connected to power. This prevents it from starting up by accident.
Next, place your saw firmly on your workbench or stand. It’s important for it to be stable. You can use clamps or a vice to stop it from moving.
Disconnecting Power and Securing the Saw
Make sure your DeWalt saw is not plugged in. Removing the power source is the first safety step. This helps you stay safe during your project.
Accessing the Blade Area Safely
Be careful when getting to the saw blade area. Lift the saw arm up for better access. Then, loosen the screw that holds the blade guard. This lets you move or take off the guard easily.
By doing these steps, you keep yourself safe. You also make sure your DeWalt saw adjustments are done right. Good preparation helps with safe and effective blade changing.
Removing the Old Blade from Your Miter Saw
Changing the blade on your miter saw is important. You must be careful to avoid getting hurt. It’s important to throw away the old blade safely to keep from getting cut or damaging your DeWalt Miter Saw.
To start, you must unlock the spindle. You do this by pressing the spindle lock button while turning the blade screw the other way. Remember, the screw is the opposite way so it stays tight when the blade spins.
| Step | Action | Part to Handle |
|---|---|---|
| 1 | Disconnect power to the saw. | Power cord |
| 2 | Press and hold the spindle lock button. | Spindle lock |
| 3 | Turn the blade screw clockwise. | Blade screw |
| 4 | Remove the outer clamp washer. | Clamp washer |
| 5 | Carefully slide the blade off the spindl.” | Old blade |
Make sure to keep all the parts you remove, like the clamp washer, in a safe place. This keeps your area clean and makes it easier to put in a new blade later. Always handle and throw away the old blade safely to avoid accidents and keep things tidy.
For getting rid of the old blade, wrap it up well and label it as sharp. This way, no one gets hurt. By following these steps, you can safely remove the old blade from your miter saw.
Installing the New Blade on Your DeWalt Miter Saw
Changing the blade on your DeWalt miter saw makes it work better. First, you must align the new blade properly. This makes sure it cuts well.
Begin by checking the blade’s teeth point back. This helps in making precise and safe cuts. Getting the blade right is important for the saw’s best work.
Then, you fix the blade in place. Put the outer clamp washer on right. It should be tight against the blade.
The next big step is tightening the blade screw. Twist it counter-clockwise to make it tight. This keeps the blade steady during work. It makes sure you’re safe and the cuts are clean.
Putting your saw’s blade in right and taking care of it is crucial. By following these steps, your DeWalt miter saw will be set. It will handle tough cuts well, keeping high quality and safety.
Adjusting and Testing After Blade Installation
After you put a new blade on your miter saw, it’s important to check it’s safe. You need to adjust the blade guard, make sure the blade is right, and do a test cut. Doing this keeps the saw working well and safe.
Ensuring the Blade Guard Is Properly Reinstalled
Getting the blade guard right is key for safety. It should move easily and cover the blade to keep you safe. After installing the blade, secure the guard and move it to check it’s working. This makes sure the blade is installed correctly.
Conducting a Safe Test Cut
To check the new blade, use a piece of scrap wood for a test cut. This makes sure the blade works and the saw is set up right. Here’s a simple guide for what to look for during your test.
| Checklist Item | Expected Outcome |
|---|---|
| Blade Stability | No wobbling or vibration during operation |
| Cut Precision | Clean and straight cut along the marked line |
| Safety Features | Blade guard moves smoothly and covers the blade during operation |
After these steps, your saw is ready for any project. You’ve checked the safety features and cutting accuracy.

Maintenance Tips for Your DeWalt Miter Saw
Maintaining your DeWalt miter saw is vital to keep it running smoothly. It needs regular cleaning, wear inspection, and preventive care. Let’s cover how to keep your saw in great shape. We’ll talk about cleaning it after use and checking for wear and tear often.
Cleaning After Use
Using your DeWalt miter saw creates dust and debris. This junk can clog up parts of the saw, like air slots. Keeping your saw clean is not just about looks. It helps the saw stay in good working order. To avoid problems, like overheating, clean your saw after each use.
You should:
- Unplug the saw first.
- Brush off or blow away the sawdust with compressed air.
- Use a clean cloth to get rid of any dust left.
- Check the blade for stuck-on gunk and clean it with a special cleaner.
Regular Check-Ups for Wear and Tear
Checking for wear and tear is key for keeping your saw working well. By looking your saw over often, you can spot problems early. This helps avoid big repair bills later. Pay attention to:
- The blade’s condition. Replace it if it looks worn out.
- How smoothly the moving parts, like adjustments, work.
- That safety features are all working right. They keep you safe while using the saw.
- Getting a pro to service your saw once a year. They’ll do a thorough check and oil the saw.
Following these steps will help make your DeWalt miter saw last longer. Plus, it will work better for all your future projects.
Conclusion
Changing the blade properly is key to keeping your DIY miter saw in good shape. Especially with a DeWalt saw, you need to be precise and careful. Doing this not only makes your saw last longer. It also makes your work safer and better. Following the steps we’ve shown means you care about doing great work with DeWalt tools.
Looking after your DeWalt saw is more than keeping it working. It’s about keeping it in top condition and protecting your money. It ensures you always make cuts that are exactly right. Whether you do this for a living or just on weekends, knowing and using these tips helps keep your saw at its best. Having these tips handy will boost your skills and confidence with every blade change.
A DeWalt is not just a saw to those who love DIY miter saw projects. It shows you aim for the best in what you do. As you finish reading this guide, think about what you’ve learned. Understand that every time you use your wrench, you’re making sure your saw stays perfect for future jobs.
FAQ
What steps do I need to follow to change the blade on a DeWalt miter saw?
To change the blade, first make sure the miter saw is unplugged. Then lift the arm and remove the blade guard. Next, use the spindle lock to stop the blade from moving.
Unscrew the blade screw with a blade wrench. Take off the old blade and put on the new one the right way. Tighten the blade screw and put the blade guard back.
How often should I replace the blade on my DeWalt miter saw?
Change the blade based on how much you use your saw and the materials you cut. Always check the blade for wear or damage. Replace it for clean and precise cuts.
What safety equipment should I wear when changing the blade on my miter saw?
Wear heavy-duty gloves to protect your hands and glasses to protect your eyes from debris.
Can I use any blade wrench to change the blade on my DeWalt miter saw?
Use the blade wrench that came with your DeWalt saw. It fits your saw’s parts for safe blade changing.
Why is it important to disconnect my DeWalt miter saw from power before changing the blade?
Unplugging the saw keeps it from starting by accident. This keeps you safe from injury during the blade change.
How do I access the blade area safely on a DeWalt miter saw?
Raise the saw arm and loosen the bracket screw to lift the blade guard. This gives you safe access to change the blade.
What is the correct placement of a new blade on a DeWalt miter saw?
Place the new blade with teeth pointing to the saw’s rear. Ensure it aligns with the inner clamp washer for proper cutting and fit.
How do I know if I’ve installed the new blade on my DeWalt miter saw correctly?
Do a test cut on scrap material to check the cut’s quality. Make sure the blade guard works and everything is secure.
What maintenance should be performed after changing the blade on my DeWalt miter saw?
Clean out sawdust from air slots and other parts. Check the saw for wear and tear regularly. Make sure all parts work well.
What is the importance of the spindle lock during a blade change?
The spindle lock keeps the blade from spinning. This lets you safely change the blade.
Why should the blade teeth be pointing towards the rear of the saw?
The teeth need to point towards the rear for the saw to cut correctly. This ensures clean and accurate cuts.
How do I clean the air slots in my DeWalt miter saw?
Use a brush or compressed air to clear sawdust and debris from the air slots. This keeps the saw from getting too hot.
What should I check during regular inspections of my DeWalt miter saw?
Check the blade’s sharpness and look for any loose or damaged parts. Make sure all safety parts, like the blade guard and brakes, work right.


