A single bearing swap — changing from a 1/2″ OD to a 3/4″ OD guide bearing — can shift your cut profile by 1/8″ on each side, turning a flush-trim operation into a decorative offset without buying a new bit. Understanding router bit bearing types and sizes is the fastest way to multiply the versatility of bits you already own, yet most woodworkers never look past the bearing that shipped from the factory. This guide breaks down every bearing style, material, and diameter you’ll encounter, with exact measurements and practical advice so you can match the right bearing to the right job on the first try.
What the Bearing on a Router Bit Actually Does
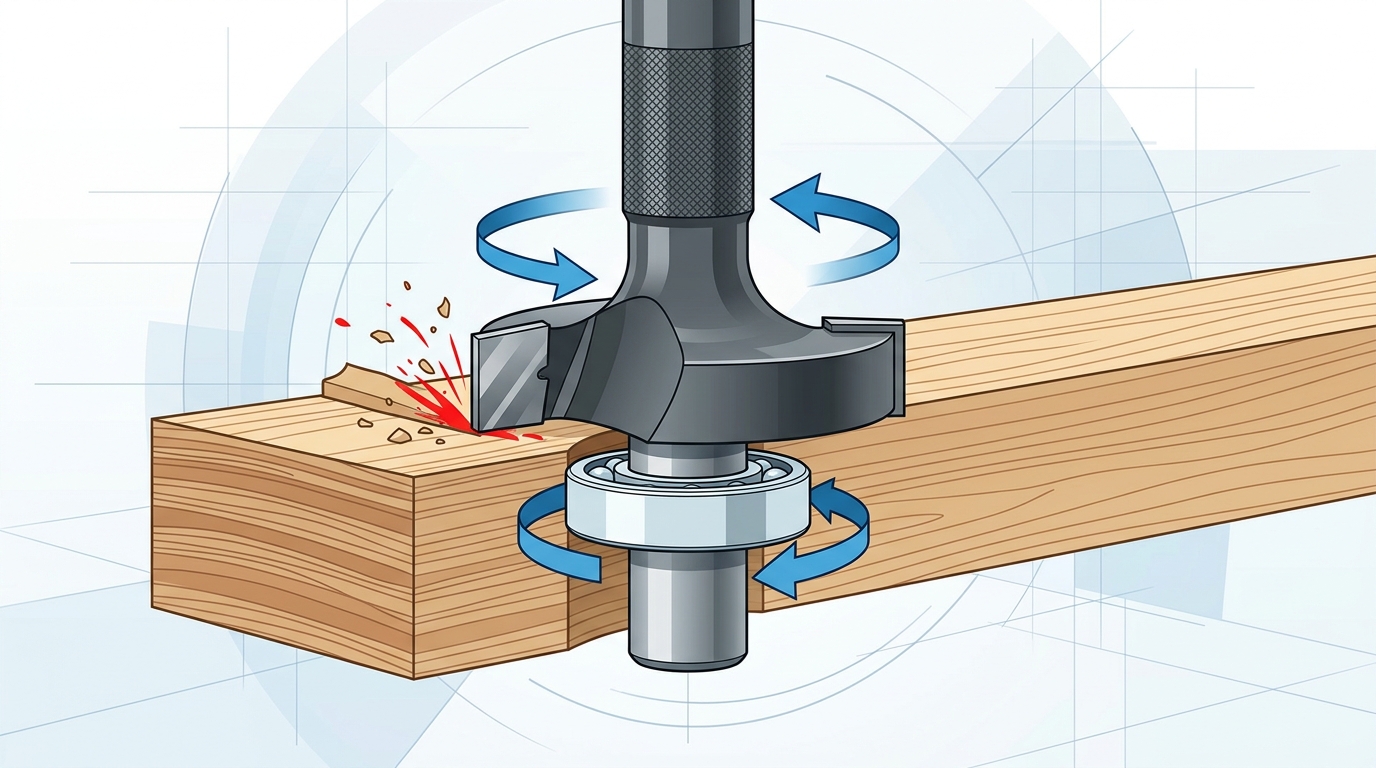
Strip away the carbide cutters, the shank, and the collet — the bearing is the single component that determines where your router bit cuts and where it stops. It acts as a pilot guide, riding along the workpiece edge or a template so the flutes remove material to a precise, repeatable depth. Without it, you’d be relying entirely on a router fence or freehand control, which introduces human error on every pass.
Here’s the critical detail most beginners miss: the bearing spins independently of the cutter body on its own set of micro ball bearings. A typical bearing rated at ABEC-1 or ABEC-3 tolerance rotates freely at speeds up to 24,000 RPM while the cutter whips around it. That independent rotation is what prevents friction burns on your workpiece. If a bearing seizes — even partially — you’ll see scorch marks within seconds, especially on maple or cherry.
Understanding router bit bearing types and sizes matters because swapping a single bearing can transform a flush-trim bit into an offset-trim bit, or change a roundover profile from 1/4″ to 3/8″ without buying a whole new cutter. The bearing’s outer diameter (OD) relative to the cutter diameter is what controls how much material gets removed. Match the OD to the cutter diameter and you get a flush cut. Go smaller, and the cutter extends past the bearing to remove more stock.
Pro tip: Before blaming a dull bit for a rough edge, check the bearing first. A worn bearing with lateral play of just 0.002″ will produce a wavy, inconsistent profile that no amount of sanding fixes cleanly.
Bearing quality also interacts with your overall bit quality. A precision-ground carbide cutter paired with a sloppy bearing defeats the purpose — something worth considering when weighing cheap router bits vs expensive options. The bearing is often the first component manufacturers downgrade to hit a lower price point.
Top-Mount vs Bottom-Mount Bearings and When to Use Each
Bearing position changes everything about how a router bit interacts with your workpiece. The same cutter geometry produces completely different results depending on whether the bearing sits above or below the cutting flutes — and picking the wrong configuration is one of the fastest ways to ruin a template job.
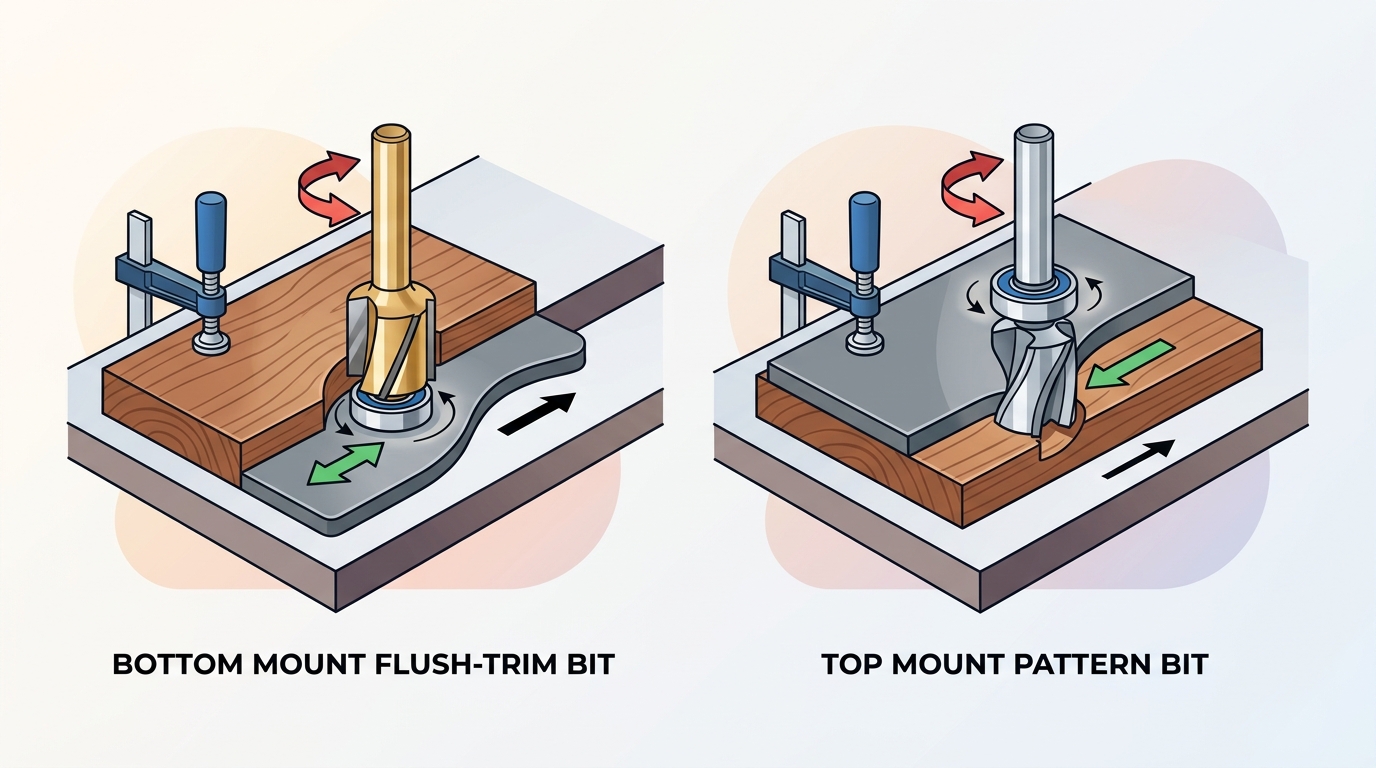
Bottom-Mount (Pilot) Bearings
A bottom-mount bearing rides along the edge of the workpiece itself or against a template placed beneath the stock. This is the standard setup on most flush-trim bits. Because the bearing is at the tip of the bit, the template goes on the bottom and the router sits on top — simple, intuitive, and ideal for trimming laminate or edge-banding flush to a substrate. Roughly 80% of handheld flush-trim operations in cabinet shops use this bottom-bearing configuration, according to tooling guides from Rockler’s routing resource center.
Top-Mount (Over-Bearing) Bearings
Flip the logic. A top-mount bearing references a template placed on top of the workpiece, which means the bit cuts downward into the stock. Pattern bits use this arrangement, and they shine on router tables where the template faces up and you can see exactly where the bearing tracks. Want cleaner results on figured hardwoods? Top-mount bearings paired with a climb-cut approach reduce tearout dramatically — something worth considering if you’re choosing bits for hardwood vs softwood.
Quick Decision Guide
- Flush trimming overhanging material: Bottom-mount. The bearing follows the substrate edge below.
- Pattern routing with a template on top: Top-mount. You maintain visual contact with the guide.
- Router table template work: Top-mount is usually safer — the template stays visible and accessible.
- Handheld template work: Bottom-mount keeps the template underneath, out of the router base’s way.
Understanding these two router bit bearing types and sizes configurations before buying saves you from owning duplicate bits that do the same job. Pro tip: some manufacturers sell combination flush-trim bits with bearings on both ends, letting you switch roles without changing the bit.
Common Router Bit Bearing Types by Design
Not all pilot bearings are created equal, and understanding the different router bit bearing types and sizes by design will save you from buying the wrong replacement or choosing the wrong bit for a job. Four distinct categories cover roughly 95% of what you’ll encounter in a woodworking shop.
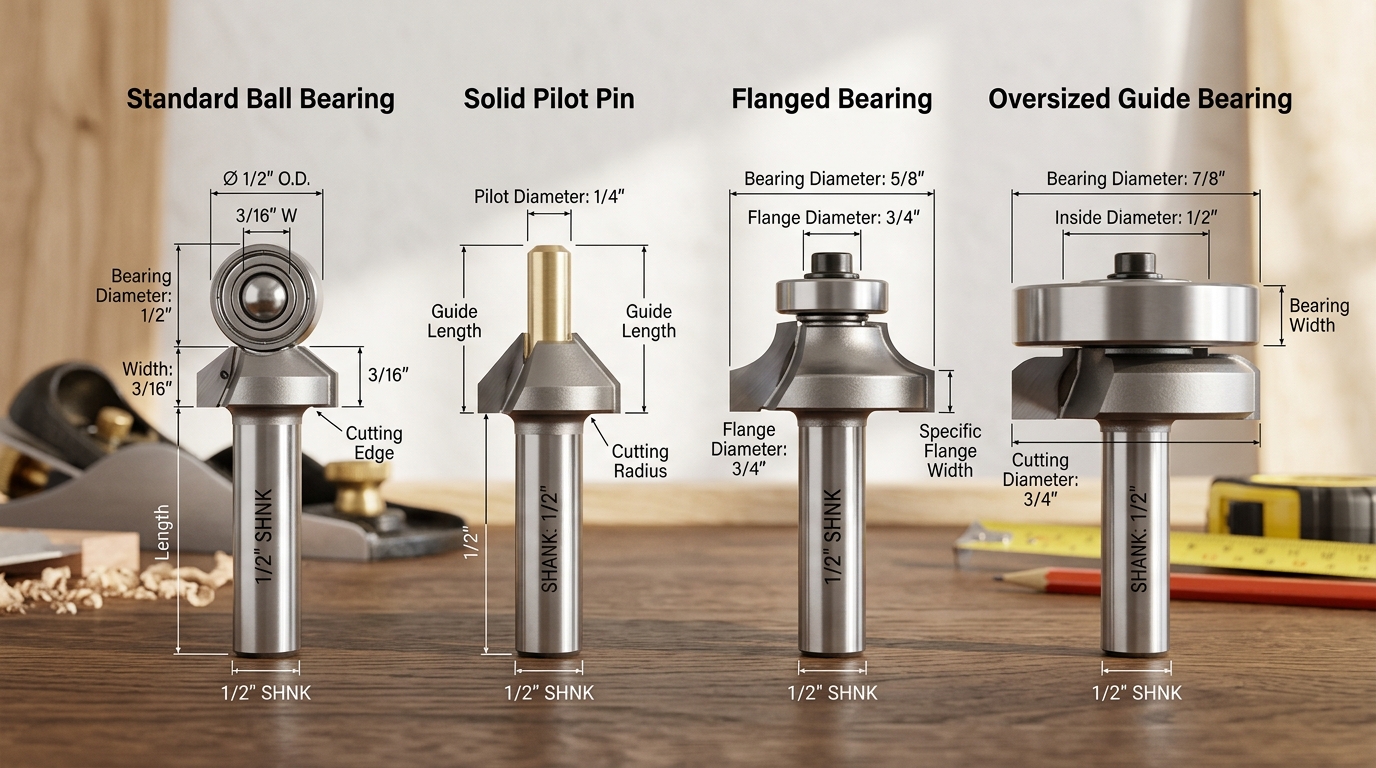
Standard Ball-Bearing Pilots
These are the workhorses. A sealed or shielded ball bearing spins freely on a central pin, letting the bit ride along a template or workpiece edge without friction burns. You’ll find them on flush-trim bits, roundover bits, chamfer bits, and most profile cutters. They typically use micro-bearings conforming to miniature bearing standards — common outside diameters range from 3/8″ to 1-1/8″.
Solid Pilot Pins (Non-Bearing)
Cheap bits often substitute a fixed steel pin for a true bearing. Skip these for finished work. The pin doesn’t rotate, which means it drags against the wood and scorches edges — especially problematic on cherry and maple. They still appear on budget rabbeting and laminate-trim bits, but the cost savings rarely justify the burn marks.
Flanged Bearings
A flanged bearing has a small lip extending beyond the outer race, acting as a built-in washer that prevents the bearing from shifting into the bit body during heavy cuts. Slot-cutting bits and biscuit-joint cutters rely on flanged designs because lateral forces are significantly higher during grooving operations.
Specialty Guide Bearings
Some applications demand oversized or undersized bearings to offset the cut from the template edge. Pattern bits and multi-profile sets ship with interchangeable guide bearings — swap a 1/2″ OD bearing for a 3/4″ OD version and you instantly change the reveal depth without buying a new bit.
Pro tip: Always match the bearing’s bore (inner diameter) to the bit’s pilot pin diameter. A bearing with a 1/4″ bore won’t seat properly on a 3/16″ pin, even if the OD looks correct.
Bearing Materials Compared — Steel, Sealed, and Ceramic
The material inside your router bit bearing determines how long it lasts, how much heat it can handle, and whether it leaves burn marks on your workpiece. When evaluating different router bit bearing types and sizes, material choice matters just as much as diameter — sometimes more.
Standard Steel Bearings
Most stock bearings ship with chrome steel balls (AISI 52100 grade). They’re cheap, widely available, and perfectly adequate for hobbyist use. The downside? Open or shielded steel bearings allow sawdust infiltration, which accelerates wear. Expect roughly 20–40 hours of active routing before you notice increased play in the bearing. For occasional weekend projects, that’s fine. For production runs, it’s a liability.
Sealed Steel Bearings
A rubber or metal seal on both sides of the bearing keeps debris out and lubricant in. This single upgrade can double or triple bearing life compared to open designs. Look for designations like “2RS” (two rubber seals) when ordering replacements — that suffix tells you the bearing is fully sealed. Sealed bearings do generate marginally more friction at startup, but the difference is negligible at routing speeds of 10,000+ RPM.
Ceramic Hybrid Bearings
Silicon nitride (Si₃N₄) ceramic balls paired with steel races represent the premium tier. Ceramic bearings run approximately 40% cooler than all-steel equivalents under identical load, according to engineering data on ceramic bearing properties. That heat reduction virtually eliminates burn marks on hardwoods like maple and cherry. The tradeoff is cost — ceramic bearings run $8–$15 each versus $1–$3 for standard steel.
Pro tip: Ceramic bearings pay for themselves fastest on flush-trim and pattern bits where the bearing rides against the template under constant contact. For intermittent-contact profiles like roundovers, sealed steel delivers 90% of the benefit at a fraction of the price.
Wondering whether bearing quality justifies a higher price tag on the bit itself? The answer depends heavily on your workload — our breakdown of cheap router bits vs expensive options covers that cost-to-value calculation in detail.
Complete Router Bit Bearing Size Chart in Imperial and Metric
Having a quick-reference chart for router bit bearing types and sizes eliminates guesswork when ordering replacements or swapping bearings to change a cut profile. The table below covers the most common outside diameter (OD), inside diameter (ID), and thickness (width) dimensions you’ll encounter across flush-trim, pattern, and edge-forming bits.
| Bearing OD (Imperial) | Bearing OD (Metric) | ID (Imperial) | ID (Metric) | Thickness | Typical Use |
|---|---|---|---|---|---|
| 3/8″ | 9.5 mm | 3/16″ | 4.76 mm | 3/16″ | Small roundover & chamfer bits |
| 1/2″ | 12.7 mm | 3/16″ | 4.76 mm | 3/16″ | 1/4″ shank flush-trim bits |
| 5/8″ | 15.88 mm | 1/4″ | 6.35 mm | 3/16″ | Cove & beading bits |
| 3/4″ | 19.05 mm | 1/4″ | 6.35 mm | 1/4″ | Standard ogee & roundover bits |
| 7/8″ | 22.23 mm | 1/4″ | 6.35 mm | 5/16″ | Rabbeting sets (with bearing kit) |
| 1″ | 25.4 mm | 1/4″ | 6.35 mm | 5/16″ | Large profile & raised-panel bits |
| 1-1/8″ | 28.58 mm | 1/2″ | 12.7 mm | 3/8″ | 1/2″ shank heavy-duty flush-trim |
| 1-1/4″ | 31.75 mm | 1/2″ | 12.7 mm | 3/8″ | Large rabbeting & slot cutters |
| 1-1/2″ | 38.1 mm | 1/2″ | 12.7 mm | 1/2″ | Panel-raising & large template bits |
Notice a pattern? Bearings with a 3/16″ or 1/4″ ID almost always pair with 1/4″ shank bits, while 1/2″ ID bearings sit on 1/2″ shank arbors. If you’re unsure which shank size suits your router, this comparison of 1/4″ vs 1/2″ shank router bits breaks it down clearly.
Pro tip: Over 80% of aftermarket bearing replacements sold in North America use the standard radial ball bearing designation system — sizes like R4ZZ (1/4″ ID × 5/8″ OD) and R6ZZ (3/8″ ID × 7/8″ OD). Knowing these ABEC-rated codes lets you source precision bearings from industrial suppliers at a fraction of the cost of branded router bit replacements.
Always verify thickness before purchasing. A bearing that’s too thin will wobble on the arbor shoulder, and one that’s too thick may bottom out against the cutter body — both scenarios ruin your cut and risk damaging the workpiece.
How Bearing Size Affects Your Cut Profile
A single router bit can produce dramatically different profiles just by swapping the bearing. The principle is simple: the bearing’s outside diameter (OD) determines how far the cutter extends past the reference surface. Increase the OD, and you reduce the cut depth; decrease it, and you expose more carbide. On a standard 1-1/4″ roundover bit, switching from a 1/2″ OD bearing to a 3/4″ OD bearing reduces the profile depth by exactly 1/8″ per side — enough to turn a full bullnose into a subtle eased edge.
This relationship matters most with three bit types:
- Roundover bits: A larger bearing leaves a flat “fillet” between the curve and the workpiece face. Woodworkers exploit this to create stepped or partial roundovers without buying a separate bit.
- Rabbeting bits: Most rabbet sets ship with a bearing kit (commonly 4–6 bearings) specifically so you can dial in rabbet widths from 3/8″ down to 1/8″. The cutter stays the same; only the bearing changes.
- Pattern/flush-trim bits: Here the bearing OD should match the cutter OD exactly. Even a 0.5 mm mismatch leaves a visible step or undercut that requires sanding. Always verify with calipers, not your eyes.
Pro tip that saves headaches: when you swap bearings to alter a profile, re-check the bit’s effective cutting geometry against your material. A smaller bearing on hardwood like maple increases lateral load on the carbide edge significantly. If you’re unsure whether your bit can handle the extra stress, this guide on router bits for hardwood vs softwood covers feed rate adjustments worth knowing.
Understanding how different router bit bearing types and sizes interact with your cutter diameter is the fastest way to multiply one bit’s versatility without spending another dollar.
For a deeper technical explanation of how bearing dimensions relate to tolerance classes and fit, Wikipedia’s rolling-element bearing article covers the engineering fundamentals behind OD, ID, and radial clearance.
How to Replace a Router Bit Bearing Step by Step
Swapping a bearing takes under five minutes once you know the process — but a single misstep can ruin the bit or, worse, send a loose bearing flying at 20,000 RPM. Here’s exactly how to do it right.
Remove the Retaining Fastener
Most bearings are held by either a small hex-socket screw (typically 2 mm or 2.5 mm Allen key) or a slotted machine screw on the bit’s pilot end. Place the bit shank in a vise with soft jaws — never clamp the carbide. Turn the screw counterclockwise. If it’s seized from heat and resin buildup, a drop of penetrating oil and 10 minutes of patience beats stripping the head.
Press Off the Old Bearing
Don’t pry with a flathead screwdriver. That gouges the shaft and creates runout. Instead, grip the bearing’s outer race and wiggle it straight off the post. A stuck bearing responds well to gentle taps from a small brass drift — brass won’t damage the hardened steel shaft the way a steel punch will.
Select the Correct Replacement
Matching router bit bearing types and sizes requires three measurements: inner bore diameter (ID), outer diameter (OD), and width. According to standardized bearing designations, a bearing marked “MR84ZZ” has an 8 mm OD, 4 mm bore, and 3 mm width. Roughly 80% of replacement errors come from confusing a 3/16″ bore (4.76 mm) with a true 5 mm bore — they look identical but wobble on the wrong shaft.
Reassemble and Verify
- Slide the new bearing onto the post by hand. It should fit snugly without force.
- Thread the retaining screw finger-tight, then add only a quarter-turn with the Allen key. Over-tightening compresses the inner race and kills free spin.
- Flick the bearing with your fingertip. It should spin freely for at least two full seconds with no grinding or hesitation.
If you’re investing in quality replacement bearings, make sure the bit itself justifies the cost — cheap router bits with soft carbide often aren’t worth re-bearing more than once.
Troubleshooting Worn or Damaged Bearings
A failing bearing rarely announces itself with a dramatic snap. Instead, it degrades gradually — and the signs show up in your workpiece before you ever feel them in your hands. Knowing what to look for saves both material and money, especially when you’re working across different router bit bearing types and sizes.
Warning Signs You Shouldn’t Ignore
- Burn marks on the wood. Dark streaks along the edge mean the bearing has seized or is dragging instead of rolling freely. This is the most common symptom.
- Lateral play. Grip the bearing and try to wiggle it side to side. Any perceptible movement beyond roughly 0.001″ indicates the races are worn out.
- Rough or gritty spinning. Flick the bearing with your finger. A healthy bearing spins silently for several seconds; a damaged one feels coarse or stops almost immediately.
- Inconsistent profiles. If your flush-trim cuts vary by even 1/64″ along the same edge, the bearing is likely wobbling on its post.
Clean It or Replace It?
Sometimes the fix is simple. Resin buildup — especially from softwoods and plywood — can mimic bearing failure. Soak the bearing in mineral spirits for 10 minutes, spin it dry, and apply one drop of light machine oil. According to Wood Magazine, roughly 30% of bearings flagged as “dead” are actually just clogged with pitch.
Replace the bearing outright if you detect flat spots (the bearing catches at one point during rotation), visible rust pitting on the races, or if the shield has cracked open. Budget bearings found on cheaper router bits tend to fail about 40% sooner than sealed or ceramic alternatives, so factor that into your diagnostic decision.
Pro tip: Keep a known-good bearing of each common size (3/8″ OD, 1/2″ OD, 3/4″ OD) in your shop drawer. Swapping in a reference bearing instantly confirms whether the old one was the problem or the bit itself is damaged.
Frequently Asked Questions About Router Bit Bearings
Are bearings interchangeable across different brands?
Yes — as long as the bore diameter (inner hole) and outer diameter (OD) match, a bearing from one manufacturer will fit another brand’s bit. The industry relies on standardized ball bearing dimensions, so a 3/8″ OD × 3/16″ bore bearing from Whiteside works on a Freud or CMT bit. Always verify both measurements before ordering, though. A mismatch of even 1/64″ on the bore will leave the bearing wobbling on the post.
What size bearing fits a 1/4-inch vs 1/2-inch shank bit?
Shank size doesn’t directly determine bearing size — the bearing post does. That said, 1/4″ shank bits overwhelmingly use bearings with a 3/16″ bore, while 1/2″ shank bits typically use a 1/4″ bore. The OD varies by bit profile: flush-trim bits usually carry a 1/2″ OD bearing regardless of shank. For a deeper comparison of how shank size affects performance, see our guide on the real difference between 1/4 and 1/2 shank router bits.
Can you run a router bit without a bearing?
Technically, yes — but only with a guide bushing or fence controlling the cut. Roughly 90% of bearing-guided operations (template routing, edge profiling) depend on that bearing for depth control. Remove it without an alternative reference surface and you’ll burn through your workpiece in seconds. Never free-hand a piloted bit with a missing bearing.
Where can you buy individual replacement bearings?
Specialty woodworking retailers like Woodcraft and Lee Valley stock individual bearings in the most common router bit bearing types and sizes. For bulk purchases or less common dimensions, industrial suppliers such as McMaster-Carr carry precision-grade bearings with ABEC-3 or higher ratings. Expect to pay $3–$8 per bearing at retail — far cheaper than replacing the entire bit.
Choosing the Right Bearing for Your Next Project
Every bearing decision boils down to three variables: what material you’re cutting, what profile you need, and how long the run is. Match those three factors correctly, and you’ll avoid 90% of the burn marks, chatter, and mid-project bearing failures that plague hobbyists and production shops alike.
Here’s a quick decision framework based on the router bit bearing types and sizes covered throughout this guide:
- Edge profiling on hardwood (oak, maple, walnut): Use a sealed steel bearing in the standard 1/2″ OD × 3/16″ bore size. Sealed bearings handle the heat buildup from dense grain without needing constant lubrication. If you’re running more than 200 linear feet in a single session, upgrade to ceramic — the reduced friction pays for itself in cleaner edges.
- Template routing or flush trimming: Bottom-mount bearing for pattern-down work, top-mount for pattern-up. Keep both a 1/2″ and 3/4″ OD bearing on hand so you can switch between flush cuts and offset profiles without changing the bit.
- Softwood or MDF projects: Standard open-shield bearings work fine here. The lower cutting resistance means heat is rarely an issue. Check whether your bit choice should change for softwood before worrying about the bearing.
Stock a small parts drawer with the five most common bearing sizes — 1/2″ OD, 5/8″ OD, 3/4″ OD, 7/8″ OD, and 1-1/8″ OD, all with 3/16″ bores. According to standard ball bearing specifications, these dimensions follow the R-series miniature bearing standard (R4, R6, R8), so replacements are widely available from any industrial supplier for $3–$8 each.
Pro tip: Label each spare bearing with its OD using a fine-point paint pen on the outer race. Fumbling through unmarked bearings mid-project wastes time and invites mistakes.
Knowing your router bit bearing types and sizes isn’t just trivia — it’s the difference between a one-bit-fits-all approach and a flexible system that adapts to every project on your bench.